
Some affiliate links are included below for supplies that I have used in this post.
For Art Teachers and Personal Use
I decided I needed a few more Fall decorations but I didn't want to spend too much, so I pulled out my paints and a canvas that I already had. I decided I would share my steps here in a tutorial. You can use the same colors that I used or you can use traditional fall colors if you prefer.
I have also included my line drawing of the pumpkin. You can download it here and trace it onto your canvas if you need to or you can draw your own pumpkin.
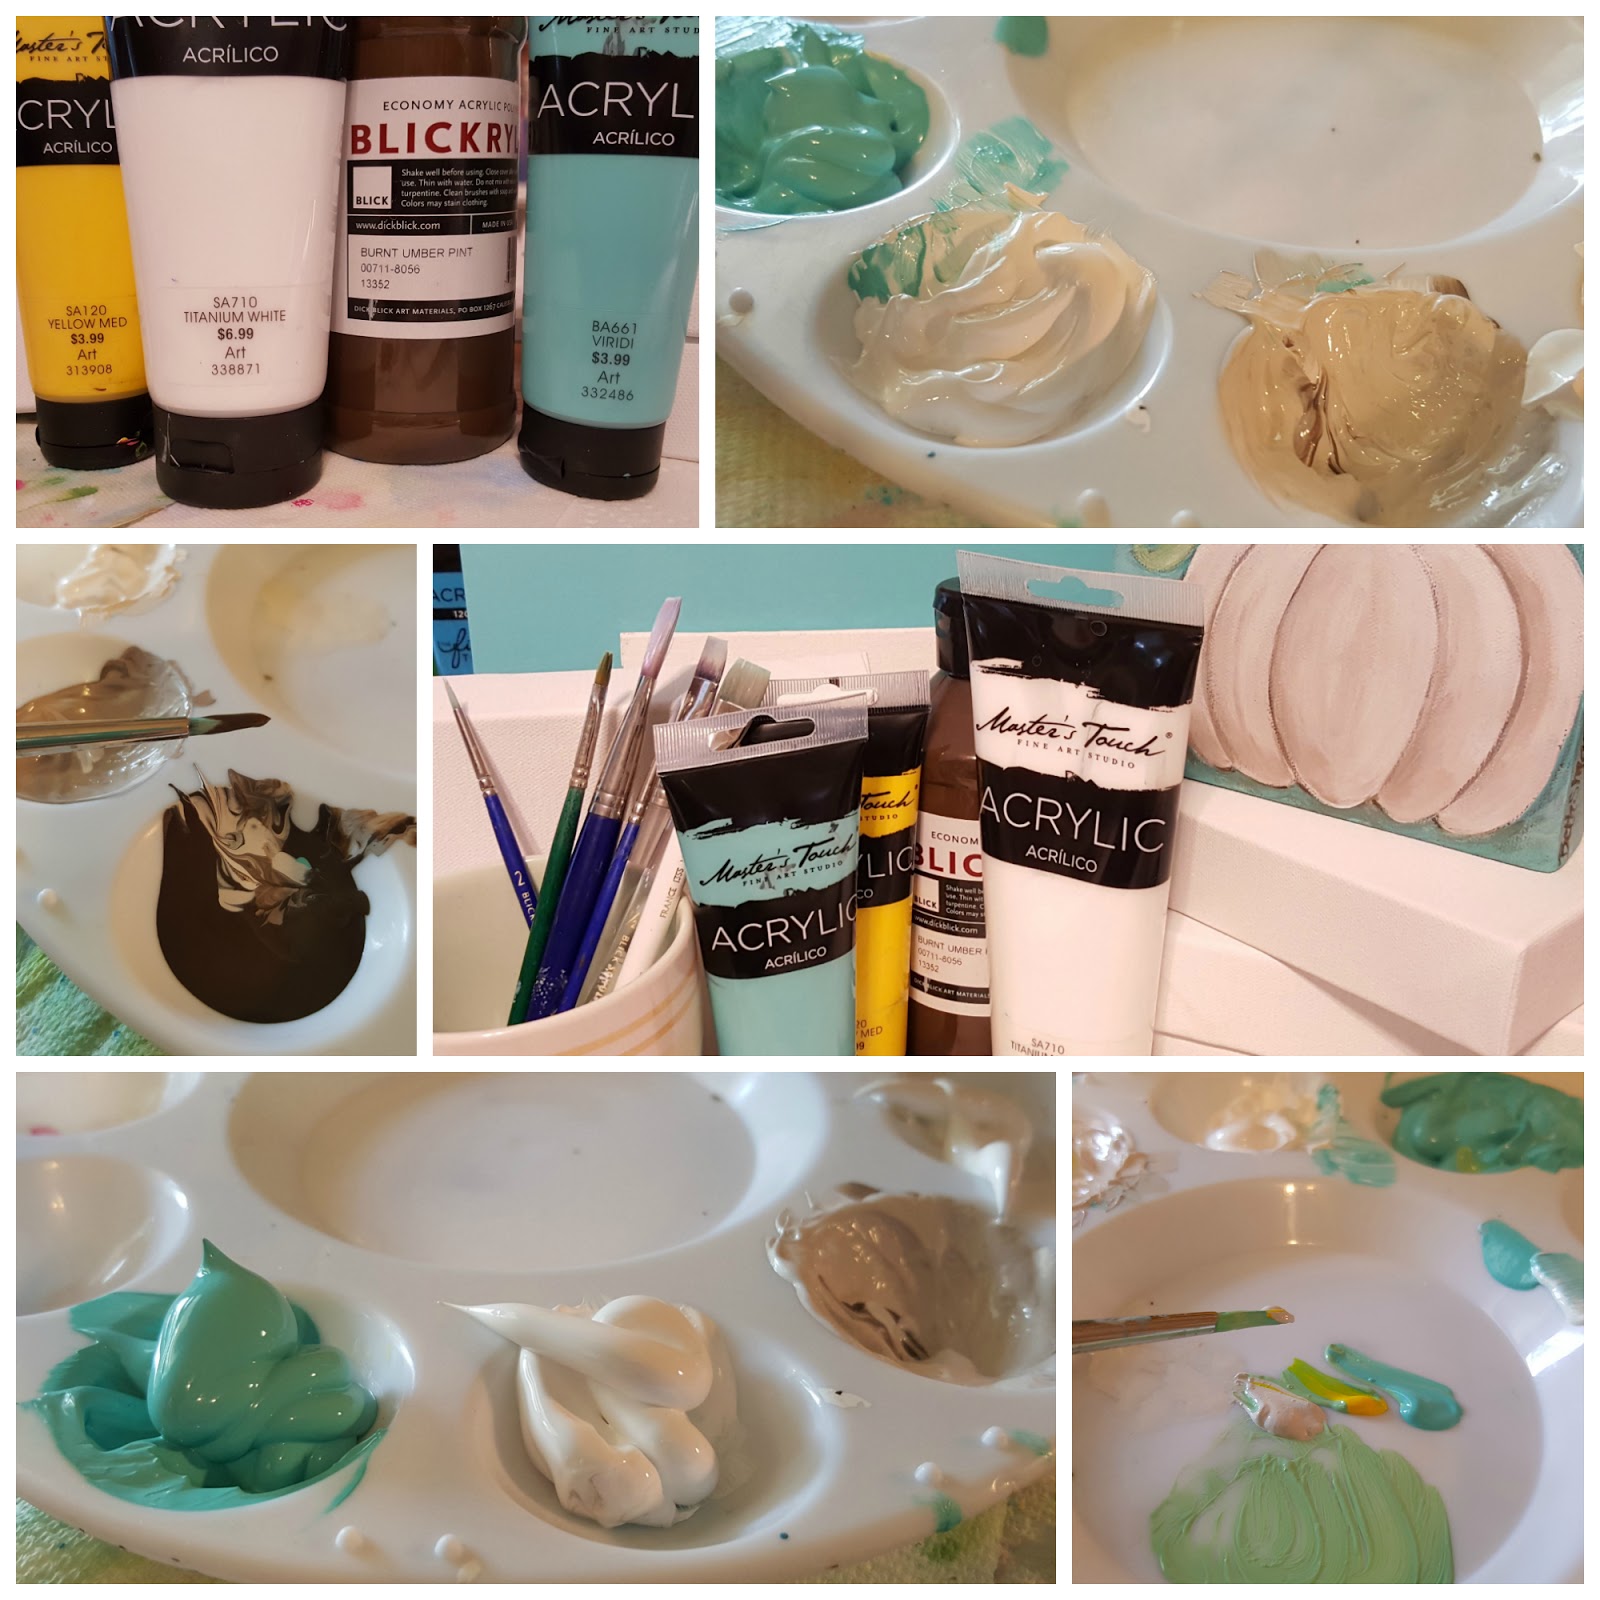
Supplies I used:
White Chalk Pencil (optional)
6"x 6" Canvas
 Variety of Paintbrushes
Acrylic Paint
Colors I Used:
Master's Touch: Viridi, Titanium White, & Yellow Medium
Blickrylic Burnt Umber (Master's Touch also has a Burnt Umber)
See links below for some of the supplies I am using.
6"x 6" Canvas
 Variety of Paintbrushes
Acrylic Paint
Colors I Used:
Master's Touch: Viridi, Titanium White, & Yellow Medium
Blickrylic Burnt Umber (Master's Touch also has a Burnt Umber)
See links below for some of the supplies I am using.
Step 1 - Preparing the canvas
Paint the entire canvas with a thin coat of Burnt Umber (brown). I always paint the canvas with a contrasting, but complementary color. This prevents the white of the canvas from showing through. It also adds some interest to the layers of paint.
Step 2 - Drawing
Draw the outline of the pumpkin using the white chalk pencil. Download my sketch here.
You can use a regular pencil, but I like the white chalk pencil because it can easily be erased to make corrections, and the white shows up on the dark background.
Transferring the drawing - You can freehand draw the pumpkin OR transfer my drawing onto your canvas. You can use the chalk pencil to color on the back of the printed line sketch then trace over the line drawing. If you do not have a chalk pencil or a piece of chalk you could use carbon tracing paper.
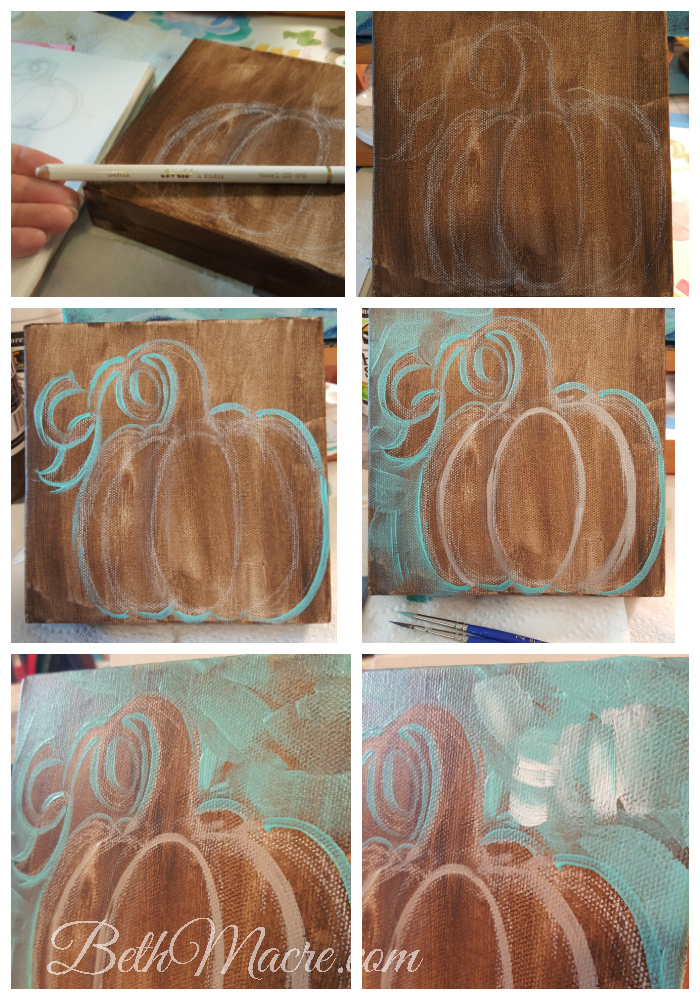 Step 3 - Background
Using the aqua blue (Master's Touch Viridi) color and a thin liner brush, I painted around the outside edge of the pumpkin. Then I used a wider brush to fill in the entire background and sides of the canvas with the turquoise blue. I add white (Titanium white) paint to my brush to add highlights to the brushstrokes.
Tips:
I leave the brushstrokes to add texture.
After the first layer dries I go over the background again with another layer of color allowing some of the first layer to show through in places. This adds depth to the background and covers most of the brown surface.
Step 4 - Pumpkin
I mix white with a little Burnt Umber (brown) in two or three shades of off-white. Using the darkest shade, I use a thin brush to outline the edge of the pumpkin. Then using the lighter shade of white+brown mixture (mostly white), I fill in the sections of the pumpkin leaving the darker outlines showing. (I go back later to finish the white parts and add more shading.)
Step 5 - Stem
Using the Burnt Umber (brown), I use a thin brush to paint the stem of the pumpkin. While the paint is still wet I dip the same brush into the off-white paint and paint streaks onto the stem to create the ridges. These ridges are usually not perfectly straight. They kind of twist on the stem like a candy cane stripe. Alternate between the brown and the off-white, using more brown, making sure the two colors partially mix and do not leave solid stripes.
Step 6 - Leaf
 The leaf is optional. You can leave it off if you just want the stem.
Mix a little yellow and off-white paint with the aqua blue (Master's Touch Viridi) that I used for the background to get a soft green. I wanted the color to be soft like the rest of the colors in the painting. I did not want a bright green. I used my thin brush to paint the outline of the leaf and then filled in the center with the same soft green color. After the first layer dried I added a highlight of a lighter shade of the same green on one edge of the leaf.
Step 7 - Pumpkin shading
After adding the stem and leaf details, the first layer of the pumpkin was dry, so I went back to add some shading. By adding shadows and highlights you can create the illusion of the round forms that you see on a pumpkin. Using a half-inch flat brush and the darker shade of off-white, I painted along the edge of one section of the pumpkin. While that paint was wet, I added a lighter shade of off-white. The two colors partially blend together. Use strokes that go up and down and follow the curve of the edges of the pumpkin. I also added some pure white paint strokes in the center of each section of the pumpkin. The lighter white creates highlights that come forward creating the illusion of form. Paint the lighter highlights in the middle and the same side of each section.
Repeat this step for each section of the pumpkin.
Tips for shading:

Highlights come forward.
Step 8 - Finish and touch-ups
Finally, look over your painting and darken any shadows that need it and add highlights where needed. More shading and highlights will add more dimension and depth to your pumpkin.
Go over any edges that need sharpening to avoid losing details.
Make sure all sides of the canvas are painted with the same brushstrokes used on the front of the canvas. The painted sides of the canvas look more finished and can be displayed without a frame.
Step 9 - Sign and Seal
Sign your art in an inconspicuous place.
I always sign my art but I don't like the signature to be a distraction so on this one I decided to paint my signature on the side edge. If there is room I usually paint it on the bottom right side corner.
To Seal or Not to Seal
An acrylic varnish or sealant will protect the painting and even out the sheen of the painting.
Some acrylic paints have a different sheen to them. Some are flat, some are glossy, some are somewhere in between. In order to even out the sheen all over the canvas, you can use an acrylic varnish. I like to use a spray-on varnish. There are both spray-on and brush-on that are good. I have used both with success.
Have fun and go paint a Pumpkin!
I hope this is helpful to anyone who wants to paint a pumpkin. Please let me know in the comments below if this was helpful to you or your students or if you have any questions.
Mrs. Macre♥Art
Supply Source Links:
Paint:
Canvas:
Blick Art Supplies: Gallery Style Stretched Canvas
Brushes:
I have a variety of brushes that I purchased. I used these while I was teaching and continue to use these brushes. They are quality brushes but economical.


Great tutorial! Adding this to my list of to-dos this month!
ReplyDeleteThanks Gina! I look forward to seeing your pumpkin painting! :)
Delete