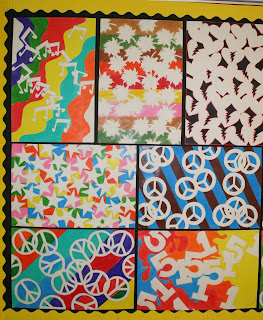
 Positive/Negative Space Design
After a full quarter of the year, my walls are full of color again. My Art 1 students are mostly 9th and 10th graders with some 11th and 12th graders too. The project I'm sharing this week is an Art 1 project from the first quarter.
This project teaches students about Positive and Negative Space and how to create a good composition. It is a good way to teach my beginners to pay attention to both the negative space (background) and the positive space (the subject).
Supplies Needed:
Drawing Paper - We used 12 x 18 inch
Colored Pencils or Markers
Pencil
Tag board or thick cardstock for patterns
Scissors
The students are asked to choose one simple shape, with interesting edges, to repeat all over the page to create a pattern. Some students chose to use 2 shapes or variations of one. They could draw their shape onto a piece of cardstock or tag board and cut it out to trace onto their page. After drawing the Positive shapes onto the page, they were to color the Negative Space (background).
Steps for design project:
1. Draw and cut out the shape out of cardstock or tagboard.
2. Trace the shapes onto the drawing paper.
Overlap the shapes to create interesting positive and negative spaces.
2. Erase the lines where the shapes overlap.
3. Add color to the background with colored pencils or markers. (We used colored pencils)
The background could be one color or they could choose the colors and patterns to enhance their design.
Tip: When adding color using colored pencils, make sure you use medium to heavy pressure with the pencils, to cover the white of the paper. This will get a good contrast between the white of the positive space and the color of the negative spaces. The design will stand out much better with strong color.
Option 2: Another option is to use markers to get a strong color contrast.
I always get some nice designs from this project; this year was no exception. This photo is only half of the artwork that I chose to display.


The projects look beautiful together.
ReplyDeleteThank you! It really brightens up the room!
ReplyDelete