Showing posts with label high school art class. Show all posts

Monday, February 2, 2015

A Lesson on Surrealism

Jr. High - High School Lesson                                by Beth Macre
Surrealism and Salvador Dali

This project is an introduction to Surrealism, Salvador Dali, Renee Magritte (or other Surrealist artists that you have examples of...)

Salvador Dali – ‘Persistence of Memory’ 
Known for Surrealism and his famous painting with the melting clocks. 
   For a short Bio of Salvador Dali and short video about his life, click on this link: 
             Biography: Salvador Dali
  ● For the official Salvador Dali website, Click here for: SalvadorDali.com 


"Pink"
by Beth S Macre
Assignment: Create a 
Mixed Media Collage that creates a unified theme using a variety of pictures and graphics from magazines


Steps to Assignment:
1. Go through magazines and cut out 10-20 images that:
    ● can be combined to create and tell
       a story.
    ● are interesting and colorful
    ● easy to cut out. (definite edges)
    ● graphic designs (letters shapes)


2. Choose a theme based on the    pictures that you have cut out.
    ● Brainstorm ideas with pictures.
    ● Find more pictures to complete the
       story.

3. Temporarily tape pictures onto the
    background paper (18x24 paper)
    ● Use one small piece of tape, 
       rolled inside out, to stick the
       picture down, temporarily.
    ● try different compositions before
       finalizing your design.


4. Draw the background, using outlines, in pencil:
    ● Draw lines around your magazine pictures that are taped down.
    ● Drawn background should pull all of the pictures together and tell a story
       and create a unified design.


5. Add color to background with markers (I used the large size Crayola markers)
    ● Color around your pictures that are still temporarily taped on the paper.
       It’s easier to color around them before they are glued down.
    ● Do not color underneath them, as the glue can cause bleeding through the pictures
       on some papers.


6. Glue pictures down when color is added.
    ● Remove tape carefully!  
    ● Glue either by sections, as sections are complete, or when all of the color is  
       finished.
   
Tips for Success:
Make sure that you do not lose or tear your pictures. You could draw outlines where they go (label what goes where) and remove them. 
Store the pictures in an envelope while you are working on the project. 
(We made envelopes with old dot matrix printing paper by folding and stapling the sides, or you could use gallon size Ziploc bags if you have them.)

Cut pictures out neatly, with smooth edges. 

Do not use too much glue, as it causes the paper to bubble. Glue sticks do not, but they do not stick as well. Use whatever type glue you have, but be sure they use it properly.

Vocabulary:
Surrealism         Creativity                  Theme              Collage
Salvador Dali     Graphic Design        Composition     Mixed Media

For more examples, see below:

"It's America"
by Beth S. Macre
"Weird, Wild, World"
by Beth S. Macre


Mrs. Macre  Loves Art!

Friday, December 5, 2014

Relax, It's December

Hey Guys!

It's December! 

Almost time for a break for the teachers out there! Yay!!!

I know teachers are counting down the days until Christmas break! I did every year!

It was/is always a crazy busy time of year for teachers, especially art teachers.  For some teachers, the end of the semester brings a slower pace to start reviewing for end of semester exams and grade papers.  I don't know about other art teachers, but this one always had students who were working on finishing big art assignments up until the last day of finals! I always gave a deadline, but if a student was trying their best to finish up a great project in time, on top of studying for other finals, I didn't have the heart to not allow them that extra day to finish. So this always lead to me also being frazzled with grading end of semester projects and giving exams. (We were required to give a final exam...not a fan of that!)

Even though I am 'retired' (I use that term loosely), I am also in the middle of being in the busiest time of year! I am getting ready for 2 more shows, plus the commissions that I have taken on that have to be finished BEFORE Christmas!  So...

...this is my work space chaos!

Hopefully after the holidays I will be ready to create some short lessons to add to this blog!

Until then....

Breath   
Relax
Create
Relax
Repeat


 Mrs. Macre  Loves Art!

Saturday, August 11, 2012

School will be starting soon...

Plaster Masks
with Acrylic and Miscellaneous found objects


It is a very strange feeling, not thinking about lesson plans and purchasing art supplies and all of the other preparations.  But it's okay. I can still share some of the projects that I have done with my students in the past.  I still find myself pinning great ideas on Pinterest! Boy, do I wish I had Pinterest when I started teaching!  But looking at all of the great ideas art teachers have gives me inspiration for my own artwork! 

Just thought I would share some photos from projects done in my class in the past. Hope some of you will get some ideas from my assignments and make them work for you! 

These masks were made out of Plastercraft on mask molds. Students added their own details like buttons and other found objects or cutout cardboard, attached, and painted for extra details. 

We used Plastercraft like this: 
Blick Art Supplies: Blick Plaster Craft

Have a wonderful year for all of the teachers, but especially the art teachers!


Mrs. Macre♥Art

Friday, June 22, 2012

The End of School

Art 3 & 4 Last Lunch Birthday Party
Senior Going Away Party Celebration
It's been awhile since I posted last! The end of the school year is always busy, but this year was especially busy! After the District Art School, there were papers to send home, Seniors to get wrapped up (they finish a couple of weeks earlier than the rest of the 'underclassmen').  So, the usual end of school activities is very hectic...but a week before school was out, I made the decision to retire from teaching!  So 'The End of School' really means the end of school for me.  I had a lot of packing and cleaning out to do...especially after 25 years in the same room!  I feel like I was moving out of my home away from home, but that I was finally graduating to the next part of my career.  I taught Art for 29 years and it was time for me to retire.  I have been thinking about it all year, but I was afraid to make that change!  But because of a lot of changes going on around me at school, I just decided that it was time for me to move on too.  I am excited about the future.  I plan to be the full time artist that I have been trying to be while teaching, but that just doesn't work very well.  So, although this is a new path for me, it is an exciting one.  I am already busy at work creating new art and learning about the business side of art.

In this photo are the students that I had in Art 3 and 4 this year.  This was a great group of students to work with! All girls except for one boy! Javon enjoyed being the only boy in a class room full of girls, but he did get kidded a lot and had to listen to some really 'interesting' conversations! But he was a very good sport about it all! All but 2 of the students in this group graduated this year and I will miss seeing the other two in class next year. I loved this class because they were all eager to come in and create every day! They loved being in the Art room!  We also enjoyed the birthday parties. Periodically we would celebrate the birthdays and bring food items for lunch to the art room and celebrate the birthdays! This photo was from our last party of the year. I think they had a great time!

As for this blog, I will post more project ideas from this year and some from in the past. In the future, I may be teaching some other art classes privately, so I plan to use this blog for that. This blog is not going to go away. I may eventually change directions, but for now, I hope to continue to get and to give advice and ideas to/from other art teachers.

Mrs. Macre♥Art 

Saturday, March 24, 2012

Finished Plastercraft Sculpture Update

Finishing Projects
Spring Break is almost over and we are into the last quarter of the school year...already! This year is going by very quickly and the last quarter always goes by even more quickly because of the end of year testing and graduation activities and getting ready for our district Art Show!

My trusty computer suddenly died recently. It had my photoshop program on it, so I haven't updated the blog because I feel lost on this borrowed computer without my photoshop.  I downloaded a preview of a newer version of photoshop so I can do some editing and posting.  I'm still trying to post the results of our plaster sculptures.

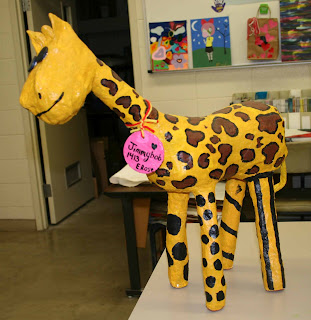
Here is the owl and Pink Dog that I created for the project samples and demonstration.

The Turtle, Giraffe, and Penguin are all created this year by some of my students in Art 3.

To see the project from the beginning, check it out here:
Up to Our Elbows in Newspaper and Tape


                Mrs. Macre♥Art 

Sunday, February 19, 2012

3D Plaster Sculptures Complete

Sculpture in the Art Room

The Sculptures from my Art 3 and 4 class are finished and I've been taking photos and editing the photos. I will include a few examples of the finished pieces in this post and a few more in the next post.  Both the students and I enjoyed this project.  They all come up with a variety of ideas and must come up with their own technique for creating their idea from the form to the final painting.  The students are good about sharing suggestions, so they work well together as a class.  The students in my Art 2, 3 and 4 classes are made up of students who REALLY want to create and try new things.  They make my day!

To see the work in project pictures, check them out here:
Creating the Forms
Plastering
More Finished Projects


Hayley's Peace Sign


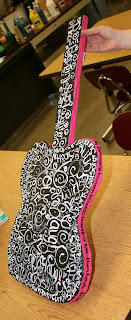
Bridgette's Pink Guitar - back side

Mrs. Macre♥Art 

Friday, January 13, 2012

Up to our Elbows in newspaper, tape, and Plaster.

Plastercraft Sculptures
After the Christmas break, we came back and jumped right into making lots of creative messes.  Art 1 students are drawing portraits, Art 2 students are painting textured abstracts on canvas, and Art 3 and 4 students are creating 3-dimensional sculptures using newspaper and masking tape forms, covered with plaster and then paint. So my classroom has been quite a mess! But that's a good sign that good things are happening, right?  Yeah, well that is what I tell myself, after apologizing to my custodian!


My Art 3 and 4 students love to experiment with new materials and try new techniques. Which is great.  They love the hands on projects!  They started these sculptures right after New Years, and they are doing very well.  I will post the start of some of their projects in this post and update them along the way.

Supplies needed:
Masking tape
Plastercraft Rolls
Buckets for warm water
Scissors
Acrylic Paint


For more tips to use in the classroom to teach this project, check out this post:
Tips for Working with Plastercraft

Here are some of the projects after creating the forms and wrapping areas in newspaper and masking tape. My next post will show the plastering process and then painting. Be ready for some awesome cuteness! **Update:  Adding Plastercraft 


Mrs. Macre♥Art    

Saturday, November 19, 2011

National Contest Winners

The DAR organization sponsors an art contest, called the JAC contest, each year with a patriotic theme.  My Advanced Art classes just completed their projects for this year and will be delivered this weekend.  So I thought I would share a photo of my students who had projects from last year that won 1st, 2nd or 3rd place,  all the way up to the District and National level.  They are very proud of their achievement.  They had to win 1st place to get to the National competition.
This patriotic theme based assignment really challenges my students to think about historical and social issues in a creative way.  The students really work hard at coming up with their idea and how to tie their idea into the theme.  Its a challenge, but I think its a really good experience for the students.
There was another national winner, but she graduated and is away at college.


Mrs. Macre♥Art    

Saturday, October 29, 2011

Color on the Walls!


Positive/Negative Space Design

After a full quarter of the year, my walls are full of color again. My Art 1 students are mostly 9th and 10th graders with some 11th and 12th graders too. The project I'm sharing this week is an Art 1 project from the first quarter.

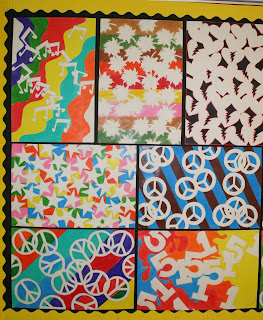
This project teaches students about Positive and Negative Space and how to create a good composition. It is a good way to teach my beginners to pay attention to both the negative space (background) and the positive space (the subject).

Supplies Needed:
Drawing Paper - We used 12 x 18 inch
Colored Pencils or Markers
Pencil
Tag board or thick cardstock for patterns
Scissors

The students are asked to choose one simple shape, with interesting edges, to repeat all over the page to create a pattern. Some students chose to use 2 shapes or variations of one. They could draw their shape onto a piece of cardstock or tag board and cut it out to trace onto their page. After drawing the Positive shapes onto the page, they were to color the Negative Space (background).

Steps for design project:
1. Draw and cut out the shape out of cardstock or tagboard.
2. Trace the shapes onto the drawing paper.
    Overlap the shapes to create interesting positive and negative spaces.
2. Erase the lines where the shapes overlap.
3. Add color to the background with colored pencils or markers. (We used colored pencils)
    The background could be one color or they could choose the colors and patterns to enhance their design.
Tip: When adding color using colored pencils, make sure you use medium to heavy pressure with the pencils, to cover the white of the paper. This will get a good contrast between the white of the positive space and the color of the negative spaces. The design will stand out much better with strong color.
Option 2: Another option is to use markers to get a strong color contrast. 

I always get some nice designs from this project; this year was no exception.  This photo is only half of the artwork that I chose to display.


Mrs. Macre♥Art     

Sunday, October 2, 2011

Update on Abstract Letter Designs


After this past week of Homecoming and dress up days, I'll be happy to get back to the business of classwork. It was very limited in some classes due to sign painting and the excitement of the dress up activities. Our door did not win the competition, but its okay.  The students were a little upset, but they were proud of our door decoration.
So here are some of the results of the Abstract letter designs that I showed works in progress a couple of weeks ago. They were to choose a theme and take words that are related to that theme and create an abstract/semi abstract composition that illustrates that theme.

Hayley and Hannah's artwork
Samantha and Courtney's artwork
Ta'chun and Brooke's artwork

Example of Themed Abstract Art
(partially incomplete bottom left corner)

Close up of Example
This project is done in my advance art class. Next I will be posting Art 1 and Art 2 projects.  Thanks for looking. I hope you enjoy the students artwork.


Mrs. Macre♥Art    


Tuesday, September 27, 2011

Time for Homecoming!

Homecoming Door Decorating Contest
Art 1st Period Decorated My Door

Doors are supposed to be judged tomorrow. I hope to be able to report that we won...again. But we'll see! 
More homecoming activity photos to come. 


Mrs. Macre♥Art    

Saturday, September 17, 2011

Abstract Letter Designs


It was a busy week at school, but I just wanted to post a few things that are in progress in the artroom at BHS. I will post final projects as soon as I can get photos of the finished works.  This project is a design project that involves choosing a theme and using words and abstracting the words by overlapping them, placing them in different directions, and then painting the designs on canvas boards.


Mrs. Macre♥Art   

Monday, September 12, 2011

Value Study of the Sheet


So here are some of the results of the value study of the sheet from the first of school along with a couple of pictures of students hard at work. I've been so busy, I haven't had time to add more pictures of projects. But I have pictures, I just need to get caught up on the dreaded 'paperwork' (grading), and will be posting pictures of projects soon.  For now, here is my Art 3 class working on their value studies of the sheet. (below)


Saturday, August 27, 2011

Drawing from Life with High School Students


Beginning of School

After two weeks the High School Art Room is beginning to look more like my typical art room. Lots of projects are in progress, art supplies are out, students are beginning to relax a little. I've been trying to stay caught up with paperwork, but I am already sick of that! If I could just teach art and not do 'paperwork', I think this would be the 'ideal' job! So far, my classes have been great and I am looking forward to a wonderful year. 

Value Studies

Supplies Needed:
Drawing Pencils - 2B-6B
White Drawing Paper - 18x24
White Sheet or piece of fabric
Lamp to Shine on the Fabric

I usually start off my Art 2 and 3 with a value study drawing.  I hang a sheet and another piece of fabric (to give them a choice) and place a lamp to shine onto the fabrics to enhance the highlights and shadows. I also place samples of drawings that I have done or former student drawings on the wall for them to see how the drawing should fill the page and the range of values that is possible when drawing something that is only black and white. The goal is for the students to learn how to add values to add depth to their drawings and to give them more experience in drawing from life.  You can see some of my students' work from this project here: Value Studies


 Mrs. Macre♥Art    

Monday, August 15, 2011

First Things First...

...is what we call our First Day of School. That was today. I spent part of my weekend getting my classroom ready for today, but I finally got it done and today went smoothly. The first day is important because we invite parents of our students to go through our students schedules with them. It was a shortened schedule, but we are able to introduce ourselves to the parents and tell them what our expectations are for the year. We started this program several years ago to get more parents involved and informed about what the High School is all about. And it sure does help to get the parents involved and understand what we do!

In the future, I have to remember to take photos in my classroom. I was so busy today, I didn't take a photo, so I am including a photo of the lobby of our school with an art show from a couple of years ago. (I have to include a photo!)

So with the first day over...I'm exhausted and hope that the rest of the week goes smoothly.
Hope everyone had a great first day of school!


Mrs. Macre♥Art    

Tuesday, August 2, 2011

Drawing/Painting Grid Portraits

Grid Self Portraits
Time to get ready...

...to go back to school....already? It seems like just a couple of weeks ago I was celebrating the beginning of summer! Classes do not start for 3 weeks, but there are supplies to order, workshops to attend, and my classroom has to be put back together.  The maintenance department came through sometime in the last 2 weeks and waxed my concrete floor (looks great!) but now I have to put everything back into place.  They move things out to wax and stack things on tables, so it takes a little time and muscle.  I want to get organized before school starts, so I have some work to do!

Grid Self Portraits - Chuck Close Style

I thought I would share a project that I have been doing with my Art 3 and 4 classes for a few years now. This pair decided to make their portraits connect, but they are 2 separate paintings. The photo above is the end project (2 canvases are being held together by the students).  Below is the photo that I took of them.  After they drew the grid on the 2 separate canvases they each drew their own portrait, using the grid method.  Then they painted their grid portraits using their own techniques. But the emphasis was using patterns like Chuck Close does on his grid portraits.  So in the bottom picture, you can see the two canvases that are in progress.  On the parts that are unpainted, you can see the grid that is drawn on the canvas.  (Click on the picture to see it larger to see the details.) I will post more grid portraits in the future. We do some type of grid portrait each year.  The students seem to really enjoy them because they can get a good likeness of the person that they are drawing.

Check back for more details and instructions on this project.

More to come...

Photo Reference

Work in progress

Have a great year!


Mrs. Macre♥Art    


Sunday, July 3, 2011

Letters from Students...

...make the stresses of the school year become a distant memory.   A few years ago, I asked my Art 3 and 4 seniors to write/create a letter to me about their art experiences or whatever they wanted to tell me...good or bad.  I enjoyed reading them so much that I have started doing this with all of my seniors and as well as the Art 2 students at the end of each semester, to have them reflect on what they have accomplished throughout the semester.  The letters that I get from my students at the end of the year, really make me remember why I teach.  If you are new to teaching, I would highly recommend that you think about doing this.  I wish that I had started doing this years ago.  Besides making a wonderful collection of memories, it could even be an end of the year project.  The colorful ones in the photo had some illustrations with them and are hanging on my bulletin board. (The heart was painted by a student who didn't take art, but wanted to come in and paint something before he graduated.)   I would recommend that they are small enough to fit into a 3 ring binder if you want to save them.  Letter size is large enough for the student to write a short letter and add some illustrations so you can keep them organized in the binder by year.

Hope you are having a great summer break! 
Mrs. Macre♥Art