Showing posts with label Mrs. Macre's Art Class. Show all posts

Saturday, August 11, 2012

School will be starting soon...

Plaster Masks
with Acrylic and Miscellaneous found objects


It is a very strange feeling, not thinking about lesson plans and purchasing art supplies and all of the other preparations.  But it's okay. I can still share some of the projects that I have done with my students in the past.  I still find myself pinning great ideas on Pinterest! Boy, do I wish I had Pinterest when I started teaching!  But looking at all of the great ideas art teachers have gives me inspiration for my own artwork! 

Just thought I would share some photos from projects done in my class in the past. Hope some of you will get some ideas from my assignments and make them work for you! 

These masks were made out of Plastercraft on mask molds. Students added their own details like buttons and other found objects or cutout cardboard, attached, and painted for extra details. 

We used Plastercraft like this: 
Blick Art Supplies: Blick Plaster Craft

Have a wonderful year for all of the teachers, but especially the art teachers!


Mrs. Macre♥Art

Sunday, April 8, 2012

Tips for working with Plastercraft


Creations with Plastercraft

Another 3 day weekend is over and we are in the last stretch of school until summer break! Seven more weeks!
The end of the year goes by so fast!
By the second semester of the year, my students begin to get bored with all of our usual supplies. We are all tired by this time of year, so it is a great time to pull out the plastercraft.

JimmyBob the Giraffe
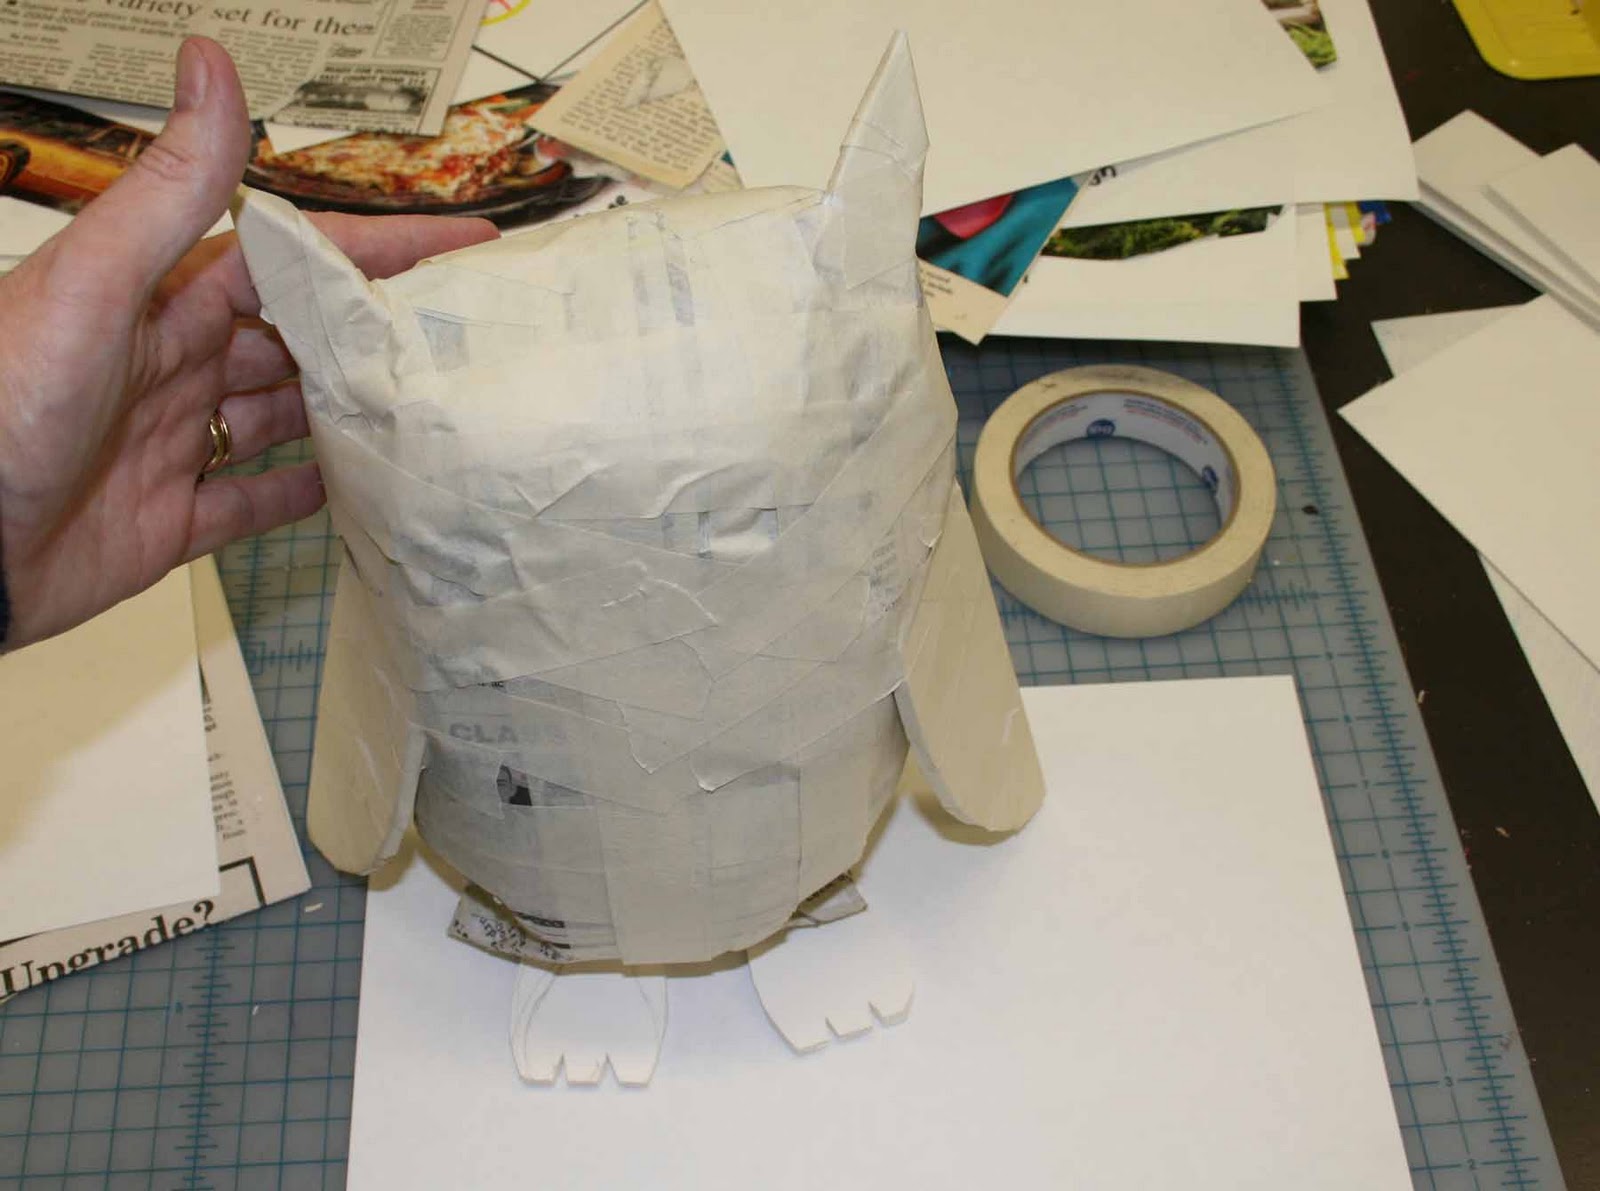
Meet one of the 3D Plaster Sculptures that is currently decorating the Art Room. JimmyBob the Giraffe was created by Sam (Samantha). JimmyBob was formed out of a lot of rolled up newspaper. You can see in the second photo how Samantha is adding layers of Plastercraft to the legs of her sculpture.

Preparation Tips for Teachers

1. Size of class matters. 
I teach this lesson to my Art 3 students. Mainly because it is always a smaller class than my Art 1 and Art 2 classes. It is easier to manage the mess and these supplies can get expensive with a large class.

2. Collect Recyclables.
Start a collection of paper towel and toilet paper tubes, newspaper, empty containers made of cardboard. These items can be used to form the foundation of your student's sculptures.
Empty plastic ice cream containers are great for carrying water to student work spaces. I may or may not have eaten lots of ice cream to contribute to this collection.
Let other teachers know what supplies you need. Maybe they can save you from over indulging in ice cream. ;) 

3. Keep a sketchbook.
Have students keep a sketchbook to sketch out their ideas for projects. They should use those sketches to plan the shapes that are needed to put together their sculpture. 

4. Buy masking tape in bulk.
Have plenty of masking tape to tape the shapes together as they are formed. I always purchased masking tape in bulk. It will be used for many projects. 

5. Buy Plastercraft in a large package. 
One small roll does not go very far. I purchase a large box similar to this photo. Whatever you do not use can be used next year. This is a picture of the type I purchased.


For more tips and techniques for using the Plastercraft., visit this post here:
   Up to Our Elbows in Newspaper, tape, and plaster

Now start collecting those paper towel rolls and ice cream buckets!


Mrs. Macre♥Art     


Sunday, January 29, 2012

Plastercraft Sculptures...Update from the Art Room

 So we have a Giraffe, an elephant, a duck, a penguin, a guitar, a peace sign, a glitter high heel shoe, a very unique cat, a purse...some of the sculptures are finished and decorating the art room.  But you can't see the finished projects yet...

So in my last post, I posted about the plaster sculptures that my students in my Art 3 and 4 classes were just starting. They were taping forms to get ready for plastering.  In this post, I  post pictures of the plastering process. I buy the plaster craft rolls by the large box. 
Like this: https://amzn.to/36qFZe9

 We use old buckets for warm water, old scissors to cut the plaster with (it's very messy work), and place newspaper on the tables and we are ready to go to work.

In my next post, I will post pictures of the sculptures in the painting stage. They are looking 'awesomely' cute! *I know that is not correct grammar, but it just doesn't come across the same with just 'so cute!'*

There are a few that are still getting some painted details, including mine!   One of the cool things about my job is that I get to play with the supplies too, especially in my Art 3 and 4 class! When I demonstrate how to use supplies and techniques, I try to work in some time, while they are working, to finish the demo project.  So I will post pictures of my demo when it gets its finishing touches.

*Update: Finished Project Update

I hope you enjoy your visit!


Mrs. Macre♥Art 

Friday, January 13, 2012

Up to our Elbows in newspaper, tape, and Plaster.

Plastercraft Sculptures
After the Christmas break, we came back and jumped right into making lots of creative messes.  Art 1 students are drawing portraits, Art 2 students are painting textured abstracts on canvas, and Art 3 and 4 students are creating 3-dimensional sculptures using newspaper and masking tape forms, covered with plaster and then paint. So my classroom has been quite a mess! But that's a good sign that good things are happening, right?  Yeah, well that is what I tell myself, after apologizing to my custodian!


My Art 3 and 4 students love to experiment with new materials and try new techniques. Which is great.  They love the hands on projects!  They started these sculptures right after New Years, and they are doing very well.  I will post the start of some of their projects in this post and update them along the way.

Supplies needed:
Masking tape
Plastercraft Rolls
Buckets for warm water
Scissors
Acrylic Paint


For more tips to use in the classroom to teach this project, check out this post:
Tips for Working with Plastercraft

Here are some of the projects after creating the forms and wrapping areas in newspaper and masking tape. My next post will show the plastering process and then painting. Be ready for some awesome cuteness! **Update:  Adding Plastercraft 


Mrs. Macre♥Art    

Saturday, May 21, 2011

Welcome to my new blog!

Welcome to my new blog and my first post! I am a high school art teacher who has been blogging my own journal for 4 years.  In my Art Journal Blog, I have been adding some occasional posts about my art class projects and thought that I would try to keep the two journals separate. I'm sure they will overlap some, but I have recently stumbled on other Art Teacher blogs that I am excited to start keeping up with! I plan to go back through my Art Journal Blog, and find the posts about classroom projects and add to this blog.  That is going on my to do list for this summer though.  This year is coming to an end in 2 weeks, so I have a lot to do over the next 2 weeks. 

I have been teaching for 28 years and I really wish that I had this technology  years ago.   I would say over these 28 years, the invention of the digital camera and the internet have been my favorite changes to teaching over the years!  Plus this year my school district installed a smart board in my classroom, so that is becoming another one of my favorite tools to teach with! (besides paints, markers, colored pencils, etc.)  

So, for now, I will be looking for old blog posts and pictures of projects and spending lots of time looking at other art teacher blogs. Along the way, I hope to meet some art teachers and get some cool ideas for class projects!  


Mrs. Macre♥Art