Saturday, November 19, 2011

National Contest Winners

The DAR organization sponsors an art contest, called the JAC contest, each year with a patriotic theme.  My Advanced Art classes just completed their projects for this year and will be delivered this weekend.  So I thought I would share a photo of my students who had projects from last year that won 1st, 2nd or 3rd place,  all the way up to the District and National level.  They are very proud of their achievement.  They had to win 1st place to get to the National competition.
This patriotic theme based assignment really challenges my students to think about historical and social issues in a creative way.  The students really work hard at coming up with their idea and how to tie their idea into the theme.  Its a challenge, but I think its a really good experience for the students.
There was another national winner, but she graduated and is away at college.


Mrs. Macre♥Art    

Saturday, October 29, 2011

Color on the Walls!


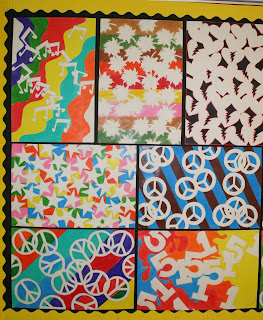
Positive/Negative Space Design

After a full quarter of the year, my walls are full of color again. My Art 1 students are mostly 9th and 10th graders with some 11th and 12th graders too. The project I'm sharing this week is an Art 1 project from the first quarter.

This project teaches students about Positive and Negative Space and how to create a good composition. It is a good way to teach my beginners to pay attention to both the negative space (background) and the positive space (the subject).

Supplies Needed:
Drawing Paper - We used 12 x 18 inch
Colored Pencils or Markers
Pencil
Tag board or thick cardstock for patterns
Scissors

The students are asked to choose one simple shape, with interesting edges, to repeat all over the page to create a pattern. Some students chose to use 2 shapes or variations of one. They could draw their shape onto a piece of cardstock or tag board and cut it out to trace onto their page. After drawing the Positive shapes onto the page, they were to color the Negative Space (background).

Steps for design project:
1. Draw and cut out the shape out of cardstock or tagboard.
2. Trace the shapes onto the drawing paper.
    Overlap the shapes to create interesting positive and negative spaces.
2. Erase the lines where the shapes overlap.
3. Add color to the background with colored pencils or markers. (We used colored pencils)
    The background could be one color or they could choose the colors and patterns to enhance their design.
Tip: When adding color using colored pencils, make sure you use medium to heavy pressure with the pencils, to cover the white of the paper. This will get a good contrast between the white of the positive space and the color of the negative spaces. The design will stand out much better with strong color.
Option 2: Another option is to use markers to get a strong color contrast. 

I always get some nice designs from this project; this year was no exception.  This photo is only half of the artwork that I chose to display.


Mrs. Macre♥Art     

Thursday, October 13, 2011

Art 1 Line Designs Lesson

LINE - Designs 


Bulletin Board with Examples

Art 1 at the High School Level is set up for students who have had little, if any, art background.  Some students have had some classes in art along the way, but many do not.  So my class starts out studying about the elements of design (art).  The first one that we study is Line.  So we start out drawing creative line designs.  This project is like giving a student permission to doodle! But it sad to say that many students cannot even doodle! Some have lost their ability to think creatively.  But I am also happy to say that many students are wonderfully creative.
Elements of Design
I start out the lesson showing the students the bulletin board, shown above, and discuss the different kinds and variations of lines.  We also talk about how to get started, in case you are completely blank with no ideas at all.  They also are required to included some color.  When I first started doing this projects, I only required black and white. But now we add some color to go with the black pen.  We use the new black sharpie pens to draw/doodle with.  Then they go back and add some color.  The others are examples of the project before we added color.

2017 UPDATE: This project is very similar to Adult Coloring Pages that are so popular today. Teachers can teach their students how to create their own coloring pages. Go a step further and have your students scan them into a computer and print copies for other students to decorate and color.


Small group of line designs as displayed in the classroom. 


Mrs. Macre♥Art    

Sunday, October 2, 2011

Update on Abstract Letter Designs


After this past week of Homecoming and dress up days, I'll be happy to get back to the business of classwork. It was very limited in some classes due to sign painting and the excitement of the dress up activities. Our door did not win the competition, but its okay.  The students were a little upset, but they were proud of our door decoration.
So here are some of the results of the Abstract letter designs that I showed works in progress a couple of weeks ago. They were to choose a theme and take words that are related to that theme and create an abstract/semi abstract composition that illustrates that theme.

Hayley and Hannah's artwork
Samantha and Courtney's artwork
Ta'chun and Brooke's artwork

Example of Themed Abstract Art
(partially incomplete bottom left corner)

Close up of Example
This project is done in my advance art class. Next I will be posting Art 1 and Art 2 projects.  Thanks for looking. I hope you enjoy the students artwork.


Mrs. Macre♥Art    


Tuesday, September 27, 2011

Time for Homecoming!

Homecoming Door Decorating Contest
Art 1st Period Decorated My Door

Doors are supposed to be judged tomorrow. I hope to be able to report that we won...again. But we'll see! 
More homecoming activity photos to come. 


Mrs. Macre♥Art    

Saturday, September 17, 2011

Abstract Letter Designs


It was a busy week at school, but I just wanted to post a few things that are in progress in the artroom at BHS. I will post final projects as soon as I can get photos of the finished works.  This project is a design project that involves choosing a theme and using words and abstracting the words by overlapping them, placing them in different directions, and then painting the designs on canvas boards.


Mrs. Macre♥Art   

Monday, September 12, 2011

Value Study of the Sheet


So here are some of the results of the value study of the sheet from the first of school along with a couple of pictures of students hard at work. I've been so busy, I haven't had time to add more pictures of projects. But I have pictures, I just need to get caught up on the dreaded 'paperwork' (grading), and will be posting pictures of projects soon.  For now, here is my Art 3 class working on their value studies of the sheet. (below)


Sunday, September 4, 2011

Colorful Portfolios...

...to hold the artwork that will be created this year have been made by my 2nd, 3rd, & 4th year art students.  Each year I begin the semester by giving them a few days to make and decorate their portfolios.  My only requirement is that they have their name on it and that they create a design. Some students really like to spruce it up. Shown here are few examples of their portfolios. We just use poster board, paint or markers, and yarn to tie the poster boards together and the students add their creativity.  Next I will be working with Art 1 to create their Portfolios.


Mrs. Macre♥Art    

Saturday, August 27, 2011

Drawing from Life with High School Students


Beginning of School

After two weeks the High School Art Room is beginning to look more like my typical art room. Lots of projects are in progress, art supplies are out, students are beginning to relax a little. I've been trying to stay caught up with paperwork, but I am already sick of that! If I could just teach art and not do 'paperwork', I think this would be the 'ideal' job! So far, my classes have been great and I am looking forward to a wonderful year. 

Value Studies

Supplies Needed:
Drawing Pencils - 2B-6B
White Drawing Paper - 18x24
White Sheet or piece of fabric
Lamp to Shine on the Fabric

I usually start off my Art 2 and 3 with a value study drawing.  I hang a sheet and another piece of fabric (to give them a choice) and place a lamp to shine onto the fabrics to enhance the highlights and shadows. I also place samples of drawings that I have done or former student drawings on the wall for them to see how the drawing should fill the page and the range of values that is possible when drawing something that is only black and white. The goal is for the students to learn how to add values to add depth to their drawings and to give them more experience in drawing from life.  You can see some of my students' work from this project here: Value Studies


 Mrs. Macre♥Art    

Monday, August 15, 2011

First Things First...

...is what we call our First Day of School. That was today. I spent part of my weekend getting my classroom ready for today, but I finally got it done and today went smoothly. The first day is important because we invite parents of our students to go through our students schedules with them. It was a shortened schedule, but we are able to introduce ourselves to the parents and tell them what our expectations are for the year. We started this program several years ago to get more parents involved and informed about what the High School is all about. And it sure does help to get the parents involved and understand what we do!

In the future, I have to remember to take photos in my classroom. I was so busy today, I didn't take a photo, so I am including a photo of the lobby of our school with an art show from a couple of years ago. (I have to include a photo!)

So with the first day over...I'm exhausted and hope that the rest of the week goes smoothly.
Hope everyone had a great first day of school!


Mrs. Macre♥Art    

Tuesday, August 2, 2011

Drawing/Painting Grid Portraits

Grid Self Portraits
Time to get ready...

...to go back to school....already? It seems like just a couple of weeks ago I was celebrating the beginning of summer! Classes do not start for 3 weeks, but there are supplies to order, workshops to attend, and my classroom has to be put back together.  The maintenance department came through sometime in the last 2 weeks and waxed my concrete floor (looks great!) but now I have to put everything back into place.  They move things out to wax and stack things on tables, so it takes a little time and muscle.  I want to get organized before school starts, so I have some work to do!

Grid Self Portraits - Chuck Close Style

I thought I would share a project that I have been doing with my Art 3 and 4 classes for a few years now. This pair decided to make their portraits connect, but they are 2 separate paintings. The photo above is the end project (2 canvases are being held together by the students).  Below is the photo that I took of them.  After they drew the grid on the 2 separate canvases they each drew their own portrait, using the grid method.  Then they painted their grid portraits using their own techniques. But the emphasis was using patterns like Chuck Close does on his grid portraits.  So in the bottom picture, you can see the two canvases that are in progress.  On the parts that are unpainted, you can see the grid that is drawn on the canvas.  (Click on the picture to see it larger to see the details.) I will post more grid portraits in the future. We do some type of grid portrait each year.  The students seem to really enjoy them because they can get a good likeness of the person that they are drawing.

Check back for more details and instructions on this project.

More to come...

Photo Reference

Work in progress

Have a great year!


Mrs. Macre♥Art